Southern Pigeon Club
  • Home
  • Membership
  • Officers
  • Contact
  • Upcoming Events
  • Articles
  • Members List
  • Show Reports
  • Home
  • Membership
  • Officers
  • Contact
  • Upcoming Events
  • Articles
  • Members List
  • Show Reports
318.792.8693
southernpigeon@gmail.com

Pigeons. A Somewhat Unknown Cult Phenomenon
 
By Dean Pushard


         Two years ago, I had no knowledge of the exciting gift that owning pigeons is. One afternoon, I was standing in my kitchen cooking when my then five-year-old son said, “hey dad, they’re shooting pigeons”. At first, I assumed he was talking about clay pigeons. I asked him if they were clay discs. He excitedly told me, “no live pigeons”. My brain then went to dove. That made a lot more sense in my mind. I walked out into the living room intrigued but still a little confused. On the television was an episode of Steven Rinella’s “Meateater”. It was season six, episode one titled, Southern Traditions: Virginia Doves. In this episode, Steven was hunting doves and pigeons in Virginia with a friend of his named Ron Boehme. I did not know it yet but at that moment, my life was changed forever. I immediately started Googling information on hunting pigeons. As an avid hunter, I was confused as to why I had never been confronted with or invited on a pigeon hunt. As I browsed through the pictures, I started to encounter very odd-looking pigeons. Pigeons with stunning colorations, weird hairstyles, big dramatic feathers on their legs. I was in awe. I also instantly wanted to know more about them. I spent most of that afternoon just finding all the information I could absorb. This was my introduction to the world of fancy pigeons.

​The initial excitement to hunt pigeons quickly disappeared. Now I wanted to own them, nurture them, tell the world about them. My first task was to convince my wife that we needed pet pigeons. This would prove a bit difficult. Her first reaction was that I was completely insane. An expected reaction I suppose. I mean at this point, I was questioning my own sanity. I showed her the most stunning pictures I could find on the internet. I gave her the brief history of them. How they were used in wars, by royalty, and in other capacities to great success. They were obviously very intelligent animals. That is exactly what kind of pets we needed, those of above average intellect. She slowly warmed up to the idea, just enough to allow it. She never understood the purpose, and possibly still does not completely today. She supports me in my pigeon endeavors though, and I could not ask for anything more.

           In the beginning, I did what most inexperienced pigeon owners do. I purchased any attractive bird I could find at the local feed stores. Breed did not matter. I had no perception of what a desirable or quality bird looked like. What I ended up with, is about 6 breeds of pigeons that most would consider “culls”. I did not care in the beginning. I was unwilling to accept people’s critiques of my birds. If people did not like my birds, they could go somewhere. I did not realize at the time that they were coming from a place of experience, and just trying to help me become a better pigeoneer. They knew that as an owner, you have a certain responsibility to the sport to move it forward and aide its’ evolvement. Breeding quality birds is what keeps the sport thriving. There are certain qualities and specifications that pigeons should be bred to meet, and in most cases, they are well documented. None of this mattered in the beginning, but today, this idea influences a lot of my decisions.

​I have since started to move away from the show bird type, and gravitated towards racing homers, but the love and dedication to them has not changed. I do everything in my power to give my birds the best shot at being successful. In my loft, success may be winning a race, or it may just be returning home safely after a twenty-five-mile toss.  Owning pigeons can honestly completely change the dynamic in a household. My entire family at the very least, appreciates what my birds have to offer. Be it beauty or homing ability, witnessing new life emerging from their shells, or watching birds of all age gracefully navigate the open space above our home. Today, I feel as though I have a duty to the sport. It is my responsibility to learn as much as I can from the elders of the sport and carry the torch into the future. I will be a voice for the sport in my inner circles and use whatever means at my disposal to reach those outside of my network. It will be my personal mission to educate all of those that are still unaware of the world of pigeons. Owning pigeons is a way of life, and I am truly blessed that my son brought them into ours. 
The Fence Post Feeder
By Charles Kendrix

Picture
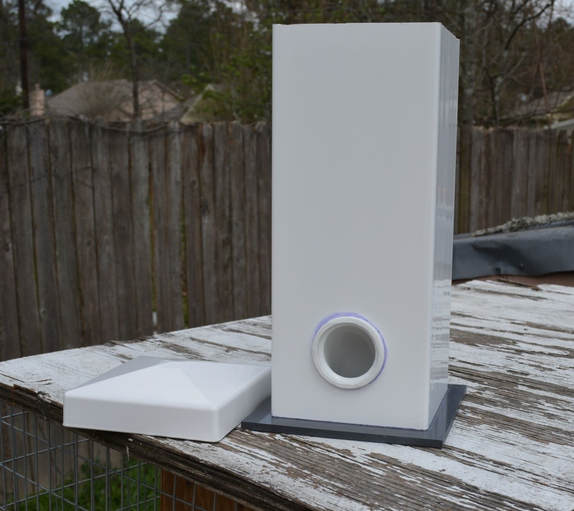
I have long searched for something that would work well for those times when I needed to leave the birds for an extended period of time.  About six months ago I finally came upon an idea that has worked very well for me.  I have used these feeders in a couple of different sizes for up to five days at time to feed the birds without having to fill them.  You will need to fill them and make sure that the birds all learn how to feed out of them before leaving them on their own for an extended period.  It is best to use a small grain or grains like wheat or milo when leaving them although I have fed mixed grains without too many problems.  The mixes I use that contain the large field corn can cause the feeder to become clogged.  With my rollers that don’t like the large corn they sometimes have to get very hungry to eat it and pull more of the other grains down. The problem with feed can be overcome by raising the feed slot further off the bottom plate.  I adjusted the height of the feed slot and the opening to the size of the birds I intended to feed with it. 
 
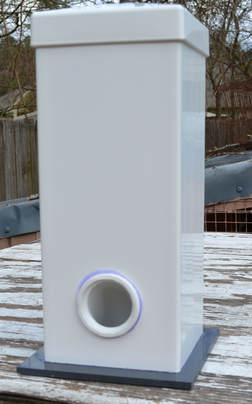
The feeder is made from a section of 5”X5” PVC fence post, a 1/8th” X 6” X 6” PVC plate, and a
1 ½” elbow or a 2” elbow depending on the size of the birds you wish to feed.   My roller feeders use the 1 ½” elbow and the 2” elbow is used for my homers.
 
The first step in building one of these feeders is to cut the 5”X5”X6’ fence post down to a size you desire which depends on how much feed you wish it to hold.  I have cut mine in the individual breed pens to 12” tall, and the ones I use in my double kit boxes and the homer boxes are 18” tall.  The 12” will last a long time with only one pair of birds in the breeder pens, and the 18” holds a lot of feed.  I have fed thirty to forty birds with two of the 18” feeders for four or five days before needing to refill.   At this first step I used a jig saw and a square to cut the sections off the fence post.  You need the bottom as square as possible since one end will need to be flat to seal tightly against the PVC plate.  Cutting the PVC is always going to leave places where you got a little out of line.  I used a hand grinder to smooth those the tower piece down square.
 
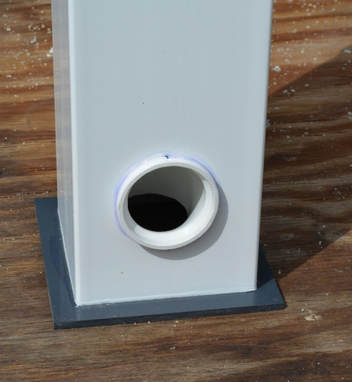
The second step is the most difficult and the need for precision most critical.  It is time to drill the hole for the elbow to sit into the tower. Note: The collar of the elbow does not slide into the hole.  The tapered shoulder on the elbow collar acts as the stop/seal for the hole.  Cutting the hole is best accomplished with a drill and hole saw.  A 2 1/8” hole saw is used to cut the holes for 1 ½” elbow, and a 2 ½” hole saw is used to cut the hole for the 2’ elbow.  The hole for the 1 ½“elbow is centered
2 ½” inches above the bottom plate.  The hole for the 2’ elbow is centered 3” above the bottom.  Once the holes are drilled, I tapered the outside of the holes slightly with a knife to make the tapered back of the elbow fit tight.
 
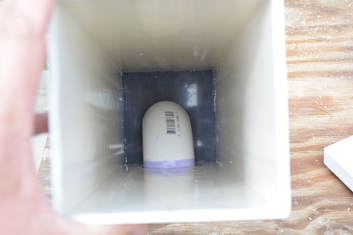
The third step is to prep the ninety degree PVC elbows.  These elbows are the slip on glue up type.  The collar of the elbow that will face out was cut down to about half its original length with a saw and the edges rounded and smoothed off with the grinder.  The reason for cutting this down is to reduce the distance the birds have to reach to get inside the feed slot.   The elbow that will face the bottom of the feeder is cut down at an angle to where the cut line is just slightly longer than the bottom line of the upper elbow at this length the lower collar is totally removed.  This was done to reduce the distance the bird must reach down into the slot to get to the feed.  It is necessary to remove the bottom collar to insert the elbow into the tower from the outside with the back of the upper collar sealing against the tower.   Most of these elbows that I used had vent knobs on them from where the PVC was flowed into the form.  These knobs have to be ground off to get the elbow to slide into the hole.   Ideally you want that lower elbow to sit approximately ¾” off the bottom or if you intend to feed with mix grain maybe a little higher.  I made some of mine only ½” off but they don’t work as well with the larger grains.  Make sure you have the height off bottom right before moving on to gluing up the feeder.  You only get one shot at it.  
 
Once you have inserted your elbows into the tower, and checked to make certain you will have enough clearance to the bottom of the tower for feed to flow freely, the next step is the glue up.  For this step I bought a small squeeze bottle with a very small tip, and filled that bottle with PVC glue with a syringe.   I used the purple PVC primer on all connections.   The first pieces to join are the elbow to the tower.  I ran a bead of glue with the squeeze bottle around the tapered back of the upper elbow collar and inserted the elbow in the tower and twisted it to get a good seal.  You should make sure the bottom of the elbow is parallel to the where the bottom plate will be glued on, and you can keep some pressure on the join while keeping the angle right by pulling the elbow from the inside of the tower.  You only need to hold this a couple of minutes.  Once it was tacked I turned the tower over and set a weight on the top of the collar.  I gave the elbows about twenty to thirty minutes to cure before moving on to setting the bottom plate.
 
Setting the bottom plate is fairly straight forward.  First check the plate against the bottom of the tower to make sure there are no large gaps.  Then run a bead of PVC glue around the bottom of the tower, and center the tower on the floor plate.  You will need to hold the floor plate in place for three or four minutes or it will tend to let the tower slide off center.  Once it was tacked I set the tower upright and set a weight on the top of the tower.  When the floor plate and elbows had cured out, I went back and ran a bead of glue around the outside of the floor plate and the elbow to add some strength to the bond.
 
The last step is just to add the fence post caps and thoroughly clean all the PVC shavings off the feeders.  The caps I used have little protrusions that act to hold them on.  They are pain in the butt when you are trying to fill the feeders.  I used the grinder to remove all these little knobs.  I worried about a problem with the floor plate separating when they were filled with feed, but I have been using them off and on for six months without a failure.  I have also since learned that PVC can be welded with a heat gun and PVC welding rods so if they do fail there may be a more permanent solution with more strength than just gluing them up.
 
I hope that this article will give some of you a solution to the problem of having to arrange for the birds care when you must be away.  Remember use them before leaving to get the birds accustomed to eating from them and to allow yourself time to spot any issues and document how long the feed lasts for your birds.  The worst thing in the world is to come home to starving or dead pigeons.
Picture
Picture
Picture
Proudly powered by Weebly
  • Home
  • Membership
  • Officers
  • Contact
  • Upcoming Events
  • Articles
  • Members List
  • Show Reports